TeamCity (in particular version 7 onwards) makes the creation of continuous delivery pipelines fairly easy. There are a number of different approaches that can be used though and there isn’t much documentation on how to do it.
This post outlines the set up that I have used for continuous delivery and also the techniques I have used to make it quick and easy to get up and running with new applications and to maintain the build configurations over multiple applications.
While this post is .NET focussed, the concepts here apply to any type of deployment pipeline.
Maintainable, large-scale continuous delivery with TeamCity series
This post is part of a blog series jointly written by myself and Matt Davies called Maintainable, large-scale continuous delivery with TeamCity:
- Intro
- TeamCity deployment pipeline
- Deploying Web Applications
- MsDeploy (onprem and Azure Web Sites)
- OctopusDeploy (nuget)
- Git push (Windows Azure Web Sites)
- Deploying Windows Services
- MsDeploy
- OctopusDeploy
- Git push (Windows Azure Web Sites Web Jobs)
- Deploying Windows Azure Cloud Services
- OctopusDeploy
- PowerShell
- How to choose your deployment technology
Designing the pipeline
When designing the pipeline we used at Curtin we wanted the following flow for a standard web application:
- The CI server automatically pulls every source code push
- When there is a new push the solution is compiled
- If the solution compiles then all automated tests (unit or integration - we didn’t have a need to distinguish between them for any of our projects as none of them took more than a few minutes to run) will be run (including code coverage analysis)
- If all the tests pass then the web application will be automatically deployed to a development web farm (on-premise)
- A button can be clicked to deploy the last successful development deployment to a UAT web farm (either on-premise or in Azure)
- A UAT deployment can be marked as tested and a change record number or other relevant note attached to that deployment to indicate approval to go to production
- A button can be clicked to deploy the latest UAT deployment that was marked as tested to production and this button is available to a different subset of people that can trigger UAT deployments
Two other requirements were that there is a way to visualise the deployment pipeline for a particular set of changes and also that there was an ability to revert a production deployment by deploying the last successful deployment if something went wrong with the current one. Ideally, each of the deployments should take no more than a minute.
The final product
The following screenshot illustrates the final result for one of the projects I was working on:
Some things to notice are:
- The continuous integration step ensures the solution compiles and that any tests run; it also checks code coverage while running the tests - see below for the options I use
- I use separate build configurations for each logical step in the pipeline so that I can create dependencies between them and use templates (see below for more information)
- This means you will probably need to either buy an enterprise TeamCity license if you are putting more than two or three projects on your CI server (or spin up new servers for each two or three projects!)
- I prefix each build configuration name with a number that illustrates what step it is relative the the other build configurations so they are ordered correctly
- You can visualise the pipeline as a graph by going to the Build Chains page, but this allows you to make some sense of what is going on at a glance on the dashboard
- Hopefully, Jetbrains will make the dashboard representation more intuitive (and the general continuous delivery picture better in general)
- I postfix each build configuration with an annotation that indicates whether it’s a step that will be automatically triggered or that needs to be manually triggered for it to run (by clicking the corresponding “Run…” button)
- I wouldn’t have bothered with this if TeamCity had a way to hide Run buttons for various build steps.
- You will note that the production deployments have some additional instructions as explained below. This keeps consistency that the postfix between the “[” and “]”are user instructions
- In retrospect, for consistency I should have made the production deployment say “[Manual; Last pinned prod package]”
- The production deployment is in a separate project altogether
- As stated above - one of my requirements that a different set of users were to have access to perform production deployments
- At this stage TeamCity doesn’t have the ability to give different permissions on a build configuration level - only on a project level, which effectively forced me to have a separate project to support this
- This was a bit of a pain and complicates things, so if you don’t have that requirement then I’d say keep it all in one project
- I have split up the package step to be separate from the deployment step
- In this case I am talking about MSDeploy packages and deployment, but a similar concept might apply for other build and deployment scenarios
- The main reason for this is for consistency with the production package, which had to be separated from the deployment for the reasons explained below under “Production deployments”
- In this instance the pipeline also had a NuGet publish, which is completely optional, but in this case was needed because part of the project (business layer entities) was shared with a separate project and using NuGet allowed us to share the latest version of the common classes with ease
Convention over Configuration
One of the main concepts that I employ to ensure that the TeamCity setup is as maintainable as possible for a large number of projects is convention over configuration. This requires consistency between projects in order for them to work and as I have said previously, I think this is really important for all projects to have anyway.
These conventions allowed me to make assumptions in my build configuration templates (explained below) and thus make them generically apply to all projects with little or no effort.
The main conventions I used are:
- The name of the project in TeamCity is {projectname}
- This drives most of the other conventions
- The name of the source code repository is ssh://git@server/{projectname}.git
- This allowed me to use the same VCS root for all projects
- The code is in the master branch (we were using Git)
- As above
- The solution file is at /{projectname}.sln
- This allowed me to have the same Continuous Integration build configuration template for all projects
- The main (usually web) project is at /{projectname}/{projectname}.csproj
- This allowed me to use the same Web Deploy package build configuration template for all projects
- The IIS Site name of the web application will be {projectname} for all environments
- As above
- The main project assembly name is {basenamespace}.{projectname}
- In our case {basenamespace} was Curtin
- This allowed me to automatically include that assembly for code coverage statistics in the shared Continuous Integration build configuration template
- Any test projects end in .Tests and built a dll ending in .Tests in the binRelease folder of the test project after compilation
- This allowed me to automatically find and run all test assemblies in the shared Continuous Integration build configuration template
Where necessary, I provided ways to configure differences in these conventions for exceptional circumstances, but for consistency and simplicity it’s obviously best to stick to just the conventions wherever possible. For instance the project name for the production project wasn’t {projectname} because I had to use a different project and project names are unique in TeamCity. This meant I needed a way to specify a different project name, but keep the project name as the default. I explain how I did this in the Build Parameters section below.
Build Configuration templates
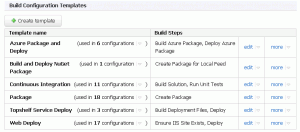
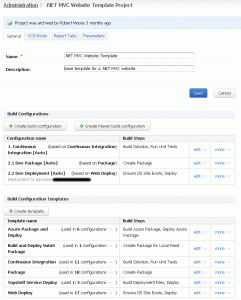
TeamCity gives you the ability to specify a majority of a build configuration via a shared build configuration template. That way you can inherit that template from multiple build configurations and make changes to the template that will propagate through to all inherited configurations. This is the key way in which I was able to make the TeamCity setup maintainable. The screenshot below shows the build configuration templates that we used.
Unfortunately, at this stage there is no way to define triggers or dependencies within the templates so some of the configuration needs to be set up each time as explained below in the transition sections.
The configuration steps for each of the templates will be explained in the subsequent posts in this series apart from the Continuous Integration template, which is explained below. One of the things that is shared by the build configuration template is the VCS root so I needed to define a common Git root (as I mentioned above). The configuration steps for that are outlined below.
Build Parameters
One of the truly excellent things about TeamCity build configuration templates are how they handle build parameters.
Build parameters in combination with build configuration templates are really powerful because:
- You can use build parameters in pretty much any text entry field through the configuration; including the VCS root!
- This is what allows for the convention over configuration approach I explained above (the project name, along with a whole heap of other values, is available as build parameters)
- You can define build parameters as part of the template that have no value and thus require you to specify a value before a build configuration instance can be run
- This allows you to create required parameters that must be specified, but don’t have a sensible default
- When there are parameters that aren’t required and don’t have a sensible default I set their value in the build configuration template to an empty string
- You can define build parameters as part of the template that have a default value
- You can overwrite any default value from a template within a build configuration
- You can delete any overwritten value in a build configuration to get back the default value from the template
- You can set a build configuration value as being a password, which means that you can’t see what the value is after it’s been entered (instead it will say %secure:teamcity.password.{parametername}%)
- Whenever a password parameter is referenced from within a build log or similar it will display as ***** i.e. the password is stored securely and is never disclosed
- This is really handy for automated deployments e.g. where service account credentials need to be specified, but you don’t want developers to know the credentials
- You can reference another parameter as the value for a parameter
- This allows you to define a common set of values in the template that can be selected from in the actual build configuration without having to re-specify the actual value. This is really important from a maintainability point of view because things like server names and usernames can easily change
- When referencing a parameter that is a password it is still obscured when included in logs :)
- You can reference another parameter in the middle of a string or even reference multiple other parameter values within a single parameter
- This allows you to specify a parameter in the template that references a parameter that won’t be specified until an actual build configuration is created, which in turn can reference a parameter from the template.
- When the web deploy post in this series is released you will be able to see an example of what I mean.
- This is how I managed to achieve the flexible project name with a default of the TeamCity project name as mentioned above
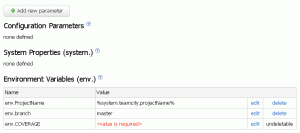
- In the template there is a variable called env.ProjectName that is then used everywhere else and the default value in the build configuration template is %system.teamcity.projectName%
- Thus the default is the project name, but you have the flexibility to override that value in specific build configurations
- Annoyingly, I had to specify this in all of the build configuration templates because there is no way to have a hierarchy of templates at this time
- There are three types of build parameters: system properties, environment variables and configuration parameters
- System properties are defined by TeamCity as well as some environment variables
- You can specify both configuration parameters and environment variables in the build parameters page
- I created a convention that configuration parameters would only be used to specify common values in the templates and I would only reference environment variables in the build configuration
- That way I was able to create a consistency around the fact that only build parameters that were edited within an actual build configuration were environment variables (which in turn may or may not reference a configuration parameter specified in the template)
- I think this makes it easier and less confusing to consistently edit and create the build configurations
Snapshot Dependencies
I make extensive use of snapshot dependencies on every build configuration. While not all of the configurations need the source code (since some of them use artifact dependencies instead) using snapshot dependencies ensures that the build chain is respected correctly and also provides a list of pending commits that haven’t been run for that configuration (which is really handy to let you know what state everything is in at a glance).
The downside of using snapshot dependencies though is that when you trigger a particular build configuration it will automatically trigger every preceding configuration in the chain as well. That means that if you run, say, the UAT deployment and a new source code push was just made then that will get included in the UAT deployment even if you weren’t ready to test it. In practice, I found this rarely if ever happened, but I can imagine that for a large and / or distributed team it could do so watch out for it.
What would be great to combat this was if TeamCity had an option for snapshot dependencies similar to artifact dependencies where you can choose the last successful build without triggering a new build.
Shared VCS root
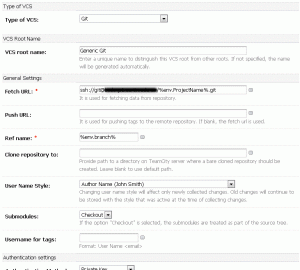
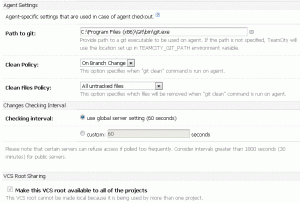
The configuration for the shared Git root we used is detailed in the below screenshots. We literally used this for every build configuration as it was flexible enough to meet our needs for every project.
You will note that the branch name is specified as a build parameter. I used the technique I described above to give this a default value of master, but allow it to be overwritten for specific build configurations where necessary (sometimes we spun up experimental build configurations against branches).
Continuous Integration step configuration
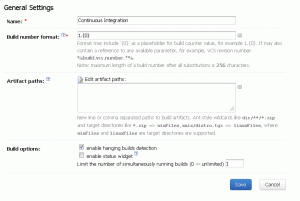
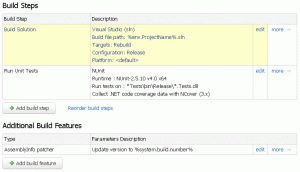
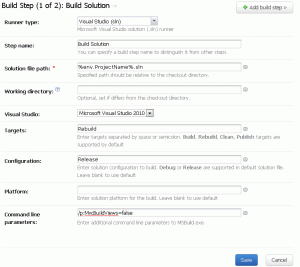
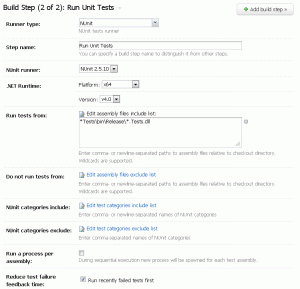
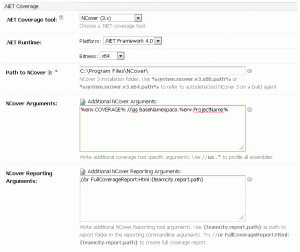
A lot of what I do here is covered by the posts I referenced in the first post of the series apart from using the relevant environment variables as defined in the build configuration parameters. Consequently, I’ve simply included a few basic screenshots below that cover the bulk of it:
Some notes:
- If I want to build a releasable dll e.g. for a NuGet package then I have previously used a build number of %env.MajorVersion%.%env.MinorVersion%.{0} in combination with the assembly patcher and then exposed the dlls as build artifacts (to be consumed by another build step that packages a nuget package using an artifact dependency)
- Then whenever I want to increment the major or minor version I adjust those values in the build parameters section and the build counter value appropriately
- With TeamCity 7 you have the ability to include a NuGet Package step, which eliminates the need to do it using artifact dependencies
- In this case that wasn’t necessary so the build number is a lot simpler and I didn’t necessarily need to include the assembly patcher (because the dlls get rebuilt when the web deployment package is built)
- I set MvcBuildViews to false because the MSBuild runner for compiling views runs as x86 when using “Visual Studio (sln)” in TeamCity and we couldn’t find an easy way around it and thus view compilation fails if you reference 64-bit dlls
- We set MvcBuildViews to true when building the deployment package so any view problems do get picked up quickly
- Be careful using such an inclusive test dll wildcard specification; if you make the mistake of referencing a test project from within another test project then it will pick up the referenced project twice and try and run all the tests from it twice
- The coverage environment variable allows projects that have more than one assembly that needs code coverage to have those extra dependencies specified
- If you have a single project then you don’t need to do anything because the default configuration picks up the main assembly (as specified in the conventions section above)
- Obviously, you need to change “BaseNamespace” to whatever is appropriate for you
- I’ve left it without a default value so you are prompted to add something to it (to ensure you don’t forget when first setting up the build configuration)
- The screens that weren’t included were left as their default, apart from Version Control Settings, which had the shared VCS root attached
Build configuration triggering and dependencies
The following triggers and dependencies are set up on the pipeline to set up transitions between configurations. Unfortunately, this is the most tedious part of the pipeline to set up because there isn’t a way to specify the triggers as part of a build configuration template. This means you have to manually set these up every time you create a new pipeline (and remember to set them up correctly).
- Step 1.1: Continuous Integration
- VCS Trigger - ensures the pipeline is triggered every time there is a new source code push; I always use the default options and don’t tweak it.
- Step 2.1: Dev package
- The package step has a build trigger on the last successful build of Step 1 so that dev deployments automatically happen after a source code push (if the solution built and the tests passed)
- There is a snapshot dependency on the last successful build of Step 1 as well
- Step 2.2: Dev deployment
- In order to link the deployment with the package there is a build trigger on the last successful build of the package
- There is also a snapshot dependency with the package step
- They also have an artifact dependency from the same chain so the web deployment package that was generated is copied across for deployment; there will be more details about this in the web deploy post of the series
- Step 3.1: UAT package
- There is no trigger for this since UAT deployments are manual
- There is a snapshot dependency on the last successful dev deployment so triggering a UAT deployment will also trigger a dev deployment if there are new changes that haven’t already been deployed
- Step 3.2: UAT deploy
- This step is marked as [Manual] so the user is expected to click the Run button for this build to do a UAT deployment
- It has a snapshot on the UAT package so it will trigger a package to be built if the user triggers this build
- There is an artifact dependency similar to the dev deployment too
- There is also a trigger on successful build of the UAT package just in case the user decides to click on the Run button of the package step instead of the deployment step; this ensures that these two steps are always in sync and are effectively the same step
- Step 4.1: Production package
- See below section on Production deployments
- Step 5: Production deployment
- See below section on Production deployments
Production deployments
I didn’t want a production build to accidentally deploy a “just pushed” changeset so in order to have a separation between the production deployment and the other deployments I didn’t use a snapshot dependency on the production deployment step.
This actually has a few disadvantages:
- It means you can’t see an accurate list of pending changesets waiting for production
- I do have the VCS root attached so it shows a pending list, which will mostly be accurate, but will be cleared when you make a production deployment so if there were changes that weren’t being deployed at that point then they won’t show up in the pending list of the next deployment
- It’s the reason I had to split up the package and deployment steps into separate build configurations
- This in turn added a lot of complexity to the deployment pipeline because of the extra steps as well as the extra dependency and trigger configuration that was required (as detailed above)
- The production deployment doesn’t appear in the build chain explicitly so it’s difficult to see what build numbers a deployment corresponds too and to visualise the full chain
Consequently, if you have good visibility and control over what source control pushes occur it might be feasible to consider using a snapshot dependency for the production deployment and having the understanding that this will push all current changes to all environments at the same time. In our case this was unsuitable, hence the slightly more complex pipeline. If the ability to specify a snapshot dependency without triggering all previous configurations in the chain was present (as mentioned above) this would be the best of both worlds.
Building the production package still needs a snapshot dependency because it requires the source code to run the build. For this reason, I linked the production package to the UAT deployment via a snapshot dependency and a build trigger. This makes some semantic sense because it means that any UAT deployment that you manually trigger then becomes a release candidate.
The last piece of the puzzle is the bit that I really like. One of the options that you have when choosing an artifact dependency is to use the last pinned build. When you pin a build it is a manual step and it asks you to enter a comment. This is convenient in multiple ways:
- It allows us to mark a given potential release candidate (e.g. a built production package) as an actual release candidate
- This means we can actually deploy the next set of changes to UAT and start testing it without being forced to do a production deployment yet
- This gives the product owner the flexibility to deploy whenever they want
- It also allows us to make the manual testing that occurs on the UAT environment an explicit step in the pipeline rather than an implicit one
- Furthermore, it allows us to meet the original requirement specified above that there could be a change record number or any other relevant notes about the production release candidate
- It also provides a level of auditing and assurance that increases the confidence in the pipeline and the ability to “sell” the pipeline in environments where you deal with traditional enterprise change management
- It means we can always press the Run button against production deployment confident in the knowledge that the only thing that could ever be deployed is a release candidate that was signed off in the UAT environment
Archived template project
I explained above that the most tedious part of setting up the pipeline is creating the dependencies and triggers between the different steps in the pipeline. There is a technique that I have used to ease the pain of this.
One thing that TeamCity allows you to do is to make a copy of a project. I make use of this in combination with the ability to archive projects to create one or more archived projects that form a “project template” of sorts that strings together a set of build configuration templates including the relevant dependencies and triggers.
At the very least I will have one for a project with the Continuous Integration and Dev package and deployment steps already set up. But, you might also have a few more for other common configurations e.g. full pipeline for an Azure website as well as full pipeline for an on-premise website.
Furthermore, I actually store all the build configuration templates against the base archived project for consistency so I know where to find them and they all appear in one place.
Web server configuration
Another aspect of the convention over configuration approach that increases consistency and maintainability is the configuration of the IIS servers in the different environments. By configuring the IIS site names, website URLs and server configurations the same it made everything so much easier.
In the non-production environments we also made use of wildcard domain names to ensure that we didn’t need to generate new DNS records or SSL certificates to get up and running in development or UAT. This meant all we had to do was literally create a new pipeline in TeamCity and we were already up and running in both those environments.
MSBuild import files
Similarly, there are certain settings and targets that were required in the .csproj files of the applications to ensure that the various MSBuild commands that were being used ran successfully. We didn’t want to have to respecify these every time we created a new project so we created a set of .targets files in a pre-specified location (c:msbuild_curtin in our case -we would check this folder out from source control so it could easily be updated; you could also use a shared network location to make it easier to keep up to date everywhere) that contained the configurations. That way we simply needed to create a single import directive in the .csproj (or .ccproj) that included the relevant .targets file and we were off and running.
The contents of these files will be outlined in the rest of the posts in this blog series.
Build numbers
One of the things that is slightly annoying by having separate build configurations is that by default they all use different build numbers so it’s difficult to see at a glance what version of the software is deployed to each environment without looking at the build chains view. As it turns out, there are a number of possible ways to copy the build number from the first build configuration to the other configurations. I never got a chance to investigate this and figure out the best approach though.
Harddrive space
One thing to keep in mind is that if you are including the deployment packages as artifacts on your builds (not to mention the build logs themselves!) the amount of harddrive space used by TeamCity can quickly add up. One of the cool things in TeamCity is that if you are logged in as an admin it will actually pop up a warning to tell you when the harddrive space is getting low. Regardless, there are options in the TeamCity admin to set up clean-up rules that will automatically clean up artifacts and build history according to a specification of your choosing.
Production database
One thing that isn’t immediately clear when using TeamCity is that by default it ships with a file-based database that isn’t recommended for production use. TeamCity can be configured to support any one of a number of the most common database engines though. I recommend that if you are using TeamCity seriously that you investigate that.
Update 7 September 2012: Rollbacks
I realised that there was one thing I forgot to address in this post, which is the requirement I mentioned above about being able to rollback a production deployment to a previous one. It’s actually quite simple to do - all you need to do is go to your production deployment build configuration, click on the Build Chains tab and inspect the chains to see which deployment was the last successful one. At that point you simply expand the chain and then click on the  button to open the custom build dialog and then run it.


